
So far, every build of this project has been an adaptation of the existing landscape. We were inspired by how this pre-existing egg-shaped grass pad was a great shape for a bowl. The existing curb also provided a great structural foundation.

Step one: digging
We called 1-800-DIG-RITE to make sure it was safe to dig. Digging started with shovels and went that way for about a month until our friend Louis offered to come help out with a Bob Cat. He works for a neighborhood company who's owner really likes what we're doing. He donated the equipment and Louis donated his time. We just provided $20 for gas. The Bob Cat was able to get out most the dirt but not everything, so we still had a ton of digging to do by hand. It would have been better to have just rented a mini excavator in the beginning and knocked it all out in one day, but we didn't have any money yet and were happy to have the help.

Louis wiggled into the hole we had already made and then dug himself out.


Step two: forms and rebar
We figured out what radius curves we would need to match the existing shape, then drew them on the plywood, cut them out, and used Tapcon screws to attach the forms to the curb. We also drilled into the curb and hammered in anchors that we could wire rebar to.

Here's a section with rebar attached, death box form, and transition form.
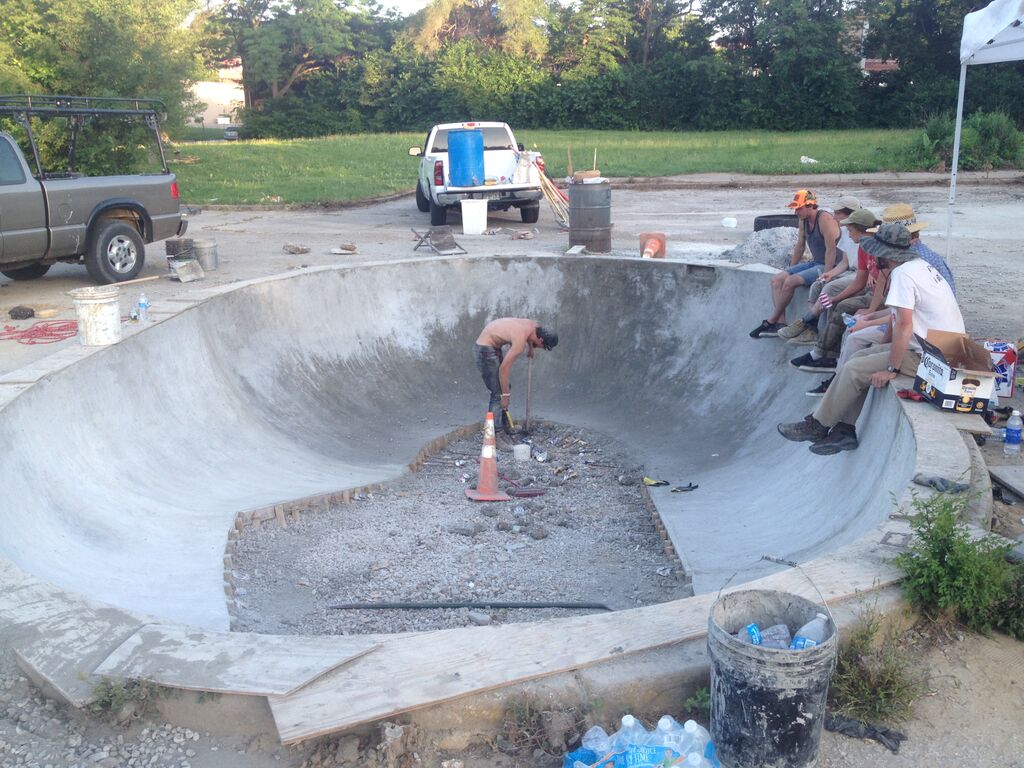
When we made our transition forms, we added 4" of flat onto the bottom of each form. That helps maintain a consistent transition from the flat areas to the transition areas, instead of having a little kink at the bottom.

^ The hole in the picture above is a 'soak away pit' or 'drain box'. The hole is so that water can collect under the bowl instead of in it. We lined the hole with landscaping fabric so that dirt wouldn't get in, then placed a pipe with holes drilled in it down to the bottom that was tall enough to reach the surface of the bowl. Then we filled in the hole with gravel. If it rains heavily, the water comes up into the bowl, but for light to moderate rain it works pretty well.
The transition forms went in next. The forms were made 2" thick so they would sit on top of the rebar so we could pull them while working with the concrete. We cut 2' stakes to hold these in place. One at the bottom, one in the middle, and secured the top to the top form.

For the bottom forms we used 'flexboard' for the curves and that worked really well. We used 2x4's for the straight sections. We used stakes to keep it in place and screwed the bottom of the transition forms to the bottom forms.

Rebar is tied every foot, vertically and horizontally. We used 3/8th" rebar because it is easier to bend by hand. Holes are drilled 2" down in the bottom form to slip the rebar through. Now we are ready for our first pour!

Step three: make tools
Because the bowl curves both vertically and horizontally, we needed some curved tools. Since we were doing a 3' radius transition in the shallow end, we made tools that were curved to that same radius curve. We bought bulk resin float material from Kraft Tool in Olathe. We cut the resin material to the right length, cut handles out of 2x4's to fit the curve, and then screwed the resin to the handle after heating it up at the oven at 400 degrees. Pre drill and countersink holes in the resin.


We also made these magnesium floats into radius trowels. Kyle was able to use a bearing press at his work to bend the trowel into the curve we needed. Another way to do it is to take the handle off, go to an existing concrete ramp with the same curve you want, heat up the trowel with a torch, and hammer the trowel against the ramp.

Step four: concrete (finally!)

At this point we were tired of hand mixing everything by hand, but not ready to order a whole truck, so we tried getting these premixed 1-yard carts of concrete that you just tow to your site. It's been a learning process of how to ask these guys to mix the concrete. We've found that if we ask for a mix for curbs it is pretty close to what we want, which is a sort of a thick mud consistency; not watery. The problem with the yard cards is that you have to have someone making multiple trips to get each load instead of it all showing up with one truck.
We tried to evenly shovel the concrete into our forms, and then used a negative radius form to shape the concrete into the radius we wanted. Once the concrete was shaped to how we wanted we pulled out out temporary transition forms and filled in the holes where they were. The concrete was worked with our resin trowels to continue shaping the concrete until all the lumps were out. Then the magnesium float trowels were used to start sealing the concrete and bringing the cream to the top. Lastly, steel finishing trowels were used to achieve a smooth surface.

We didn't have the experience to pour the whole bowl at once, so we did the shallow end first. When it was time to make the deep end, we made new radius trowels to fit the deep end, which had a 5ft radius.

Next, we poured the deep end of the bowl in about the same way as the shallow. The deep end had much more surface area to work, making it much harder for us. We strategically did this after the shallow so we could work on our techniques on an easier section. We had a lot of people come out this day, and we ran into an annoying snag when the concrete truck showed up 3 hours late. We lost a lot of our helpers by the time the truck finally showed up. We were also trying to beat the heat by starting early. It got up to about 100 degrees that day and we were working the concrete until the evening.

Next was the flat of the bowl, which was not too difficult after what we had already done. We bought a cast iron floor drain from an Ace Hardware. We used a level to make sure the top of the drain was just below the deep end flat, so that the water wouldn't pool anywhere else. Once we had it in the right place we just duct taped it in place and shoveled the concrete around it.

Step five: coping
Because our fellow skateboarders had been so supportive of this project, we were able to purchase pool coping from Tedderstone, who makes coping specifically for skate parks. The cheaper DIY way to do this is build your own pool coping molds or you can free hand all the coping. The Tedderstone coping has a great shape and is very smooth, so we were happy to have it on our bowl. We installed the coping using mortar mix. We mixed the mortar, laid a 'bed' of it down about 2 inches thick, placed the coping down, wiggled it and tapped it with a rubber mallet to set it in place. We took the excess mortar and rubbed it into the cracks in between the coping pieces. We also used a level to make sure the coping was all even.


The last step for the coping was to scrape out the mortar in the seam in between each coping block, right where it's going to be grinded. We filled in those seams with a concrete bonding epoxy. This epoxy won't chip out, like the mortar will, so the coping stays in good shape.
The final step we did was to seal the concrete with a Deep Penetrating Sealer made by Evercrete. It was recommended to us by some skate park builders. This helps weather seal the concrete, which makes a big difference in our frigid midwest winters.
And it is done!

We started digging our hole in late March, and the bowl was finally skateable almost 4 months later in early July. It was a slow process, starting with shovels and volunteers who were just figuring it out as we went. This was a huge learning process project for us, and prepared us to start expanding the park around the bowl.
We can't say thank you enough to the huge community effort that made this project happen. Countless volunteer hours were logged by what seemed like at least a hundred different people. Local businesses donated gift certificates and venues donated their spaces for fundraisers. People we'd never met before brought us tools, materials, and cash donations. PBR's local marketing guy hooked us up with a $2,000 donation. We were fortunate enough to win our first grant from the Charlotte Street Foundation, which helped us finish off the very last parts of the bowl and also gave us a huge kickstart to keep the project rolling and begin expanding around the bowl.
Thank you, thank you, thank you to everyone that chipped into this wild idea! It wouldn't have been possible without so many of a friends and other great people of Kansas City that we didn't even know were paying attention.